
Hi SharePoint guys,
 Thanks to Modern Pages and the SharePoint Framework in SharePoint Online, we, as SharePoint specialists are able to offer our users a great user experience.
To deliver and maintain our solutions, we need to automate and standardize our deployments. For this, we can use tools based on PowerShell scripts.
Remote Provisioning
We know that, for some reasons, the Feature Framework and the declarative provisioning of assets is not the recommended approach anymore (I would dare to say : “Avoid it as much as possible!”).
We will prefer remote provisioning which is, in a sense: “Do programatically using APIs what you would do manually in the UI”, we will, that way, avoid any annoying Feature References. I encourage you to watch this webcast that explains these things pretty well.
The PnP Provisioning Engine
The PnP community distributes a core library that addresses a lot of boilerplate tasks SharePoint developers commonly have to do. This library ships an engine that relies on the various capabilities of the library to provision SharePoint assets according to an external template file. It is a great option to provision the assets and artifacts of an entire site. (e.g. Provision a site on-demand based on a template, Deploy your application assets to different environments, ….)
PnP PowerShell
The PnP community also distributes an enormous set of PowerShell Cmdlets that wraps the features of the PnP Core library. If your deployment/provisioning tool needs some dynamic configuration or some scripted conditions, it then makes more sense to rather use PowerShell scripts to provision your assets than a “static” template.
In my humble opinion, it is even a totally valid approach to combine both. We could think of provisioning “default” assets with the provisioning engine (which can also be used through a PnP PowerShell cmdlet) and provision dynamically some stuff under certain conditions with, for instance, computed values.
To test the features described below, you need to install the PnP PowerShell module. You can either install a .msi package or use the Install-Module command in a PowerShell console (Check the GitHub repository for more info).
NOTE: These capabilities are a fresh addition in the PnP PowerShell project, if you already installed it previously, make sure to upgrade it to the September 2017 release. Moreover, at the time of this writing, these are currently available only for the SharePoint Online platform.
SPFx solution samples
To test these capabilities, I suggest you to fetch my solution samples
- The KanbanBoard WebPart
- Some SPFx extensions samples
Both solutions can be fetched from my GitHub SPFx sample repo
To install them, you have to update the write-manifests.json file with your CDN location in both solutions, build the bundles and packages and upload the .sppkg‘s into your app catalog and the bundles files into your CDN location.
These solution leverage the new skipDeploymentFeature option.
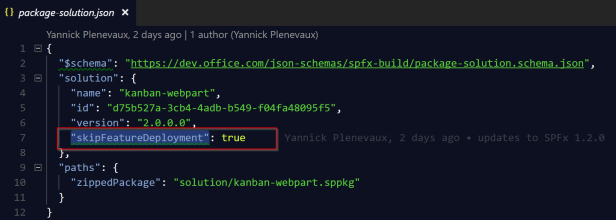
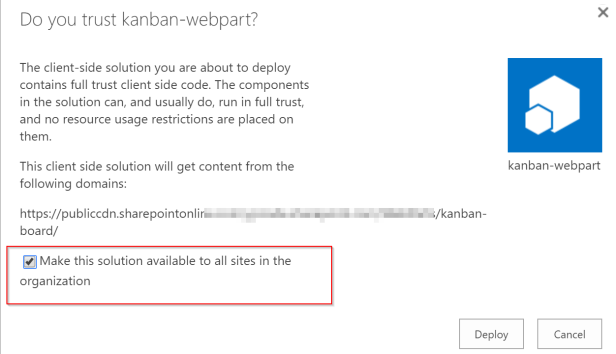
However, it is absolutely not mandatory. But if you don’t choose that option, you will need to “add the app” on your target site.
Provision and manipulates Modern Pages and SPFx WebParts
Provision a new Modern Page
This file contains bidirectional Unicode text that may be interpreted or compiled differently than what appears below. To review, open the file in an editor that reveals hidden Unicode characters.
Learn more about bidirectional Unicode characters
| Connect-PnPOnline https://contoso.sharepoint.com/sites/dev -Credentials contoso | |
| Add-PnPClientSidePage -Name test -LayoutType Article -PromoteAs NewsArticle -Publish -PublishMessage "Final version" |
Configure the sections on a Modern Page
This file contains bidirectional Unicode text that may be interpreted or compiled differently than what appears below. To review, open the file in an editor that reveals hidden Unicode characters.
Learn more about bidirectional Unicode characters
| Connect-PnPOnline https://contoso.sharepoint.com/sites/dev -Credentials contoso | |
| $page = Add-PnPClientSidePage -Name "three column.aspx" | |
| Add-PnPClientSidePageSection -Page $page -SectionTemplate ThreeColumn |
Add text and built-in WebParts on a Modern Page
This file contains bidirectional Unicode text that may be interpreted or compiled differently than what appears below. To review, open the file in an editor that reveals hidden Unicode characters.
Learn more about bidirectional Unicode characters
| Connect-PnPOnline https://contoso.sharepoint.com/sites/dev -Credentials contoso | |
| $page = Add-PnPClientSidePage -Name "Hello World" | |
| Add-PnPClientSidePageSection -Page $page -SectionTemplate TwoColumn | |
| Add-PnPClientSideText -Page $page -Section 1 -Column 1 -Text "Hello" | |
| Add-PnPClientSideText -Page $page -Section 1 -Column 2 -Text "World!" | |
| Add-PnPClientSidePageSection -Page $page -SectionTemplate OneColumn | |
| Add-PnPClientSideWebPart -Page $page -Section 2 -Column 1 -DefaultWebPartType BingMap |
Setup a WebPart on a Modern Page
Create a new Install-WebPart.ps1 file and put the following content in it. Adapt the default values and the properties to set on your WebPart.
This file contains bidirectional Unicode text that may be interpreted or compiled differently than what appears below. To review, open the file in an editor that reveals hidden Unicode characters.
Learn more about bidirectional Unicode characters
| param ( | |
| [Parameter(Mandatory=$true)] | |
| [string] $TargetWeb, | |
| [Parameter(Mandatory=$true)] | |
| [string] $TasksLibraryName, | |
| [Parameter(Mandatory=$false)] | |
| [string] $PageName = "Kanban Board", | |
| [Parameter(Mandatory=$false)] | |
| [string] $StatusFieldName="Status" | |
| ) | |
| # Connect to the target SharePoint Website | |
| Connect-PnPOnline $TargetWeb | |
| # Fetch the tasks list for the specified name | |
| $tasksList = Get-PnPList $TasksLibraryName | |
| # Add the Client-side Page with the name specified | |
| Add-PnPClientSidePage -Name $PageName | |
| # Add the Kanban Board WebPart and configure its properties | |
| Add-PnPClientSideWebPart -Page $PageName -Component KanbanBoard -WebPartProperties @{tasksListId=$tasksList.Id; statusFieldName="Status"} | |
| # Publish the page when all config is done | |
| Set-PnPClientSidePage -Identity $PageName -Publish |
[EDIT]
At the time of this writing (September, 10th 2017), I encounter an issue with the current release of the PnP PowerShell kit when I execute the script above. (It was originally written with the DEV branch of the project). I don’t know if it is only me. but if not, it should be fixed pretty soon.
This is now fixed. Please upgrade to latest version of PnP PowerShell (2.18.1709.1).
Setup your SPFx extensions
While extensions are also available in your whole tenant using the skipDeploymentFeature option, they require to be associated to either Custom actions (for Application Customizers and ListView Command Sets) or Field (Field Customizers).
Setup your ApplicationCustomizer extension
Pretty straightforward, this snippet allows you to associate your application customizer to your site.
This file contains bidirectional Unicode text that may be interpreted or compiled differently than what appears below. To review, open the file in an editor that reveals hidden Unicode characters.
Learn more about bidirectional Unicode characters
| ############################################################ | |
| # Set here the URL of your site | |
| $targetWebUrl = "https://yourtenant.sharepoint.com/sites/yoursite" | |
| # Set the name of the custom action here (do not really matter in this case but allows to identify it) | |
| $customAction = "MotdBanner" | |
| # Set here the Id of your extension. You can find it in the manifest in your SPFx solution | |
| $componentId = "42887c3b-0b7c-4fc4-8510-1107c73495c9" | |
| ############################################################ | |
| Connect-PnPOnline $targetWebUrl | |
| Add-PnPCustomAction -Name $customAction -Title "MOTD" -Location "ClientSideExtension.ApplicationCustomizer" -ClientSideComponentId $componentId -ClientSideComponentProperties "{}" |
Setup your FieldCustomizer extension
The PowerShell snippet below allows you to associate your FieldCustomizer to a list column. To associate to a site column instead, just drop the -List $list argument from the command line.
This file contains bidirectional Unicode text that may be interpreted or compiled differently than what appears below. To review, open the file in an editor that reveals hidden Unicode characters.
Learn more about bidirectional Unicode characters
| ############################################################ | |
| # Set here the URL of your site | |
| $targetWebUrl = "https://yourtenant.sharepoint.com/sites/yoursite" | |
| # Set the name of the custom action here (do not really matter in this case but allows to identify it) | |
| $customAction = "ImportantMarker" | |
| # Set here the Id of your extension. You can find it in the manifest in your SPFx solution | |
| $componentId = [GUID]"42887c3b-0b7c-4fc4-8510-1107c73495c9" | |
| # Set here the Id or name of the list | |
| $listNameOrId = "MOTD" | |
| # Set here the internal name of the field to bind the extension to | |
| $fieldInternalName | |
| ############################################################ | |
| Connect-PnPOnline $targetWebUrl | |
| $list = Get-PnPList $listNameOrId | |
| Set-PnPField -List $list -Identity $fieldInternalName -Values @{ClientSideComponentId=$componentId} |
Setup your ListViewCommandSet extension
At the time of this writing, this one is just a bit more complex because of some inconsistencies in the Cmdlet arguments in the current release.
This file contains bidirectional Unicode text that may be interpreted or compiled differently than what appears below. To review, open the file in an editor that reveals hidden Unicode characters.
Learn more about bidirectional Unicode characters
| # This script allows to associate a SPFx ListViewCommandSet extension to a list type (100) | |
| ###################################################################### | |
| # Due to some inconsistency in accepted Cmdlet arguments | |
| # We need to work around it by updating manually the RegistrationId and RegistrationType values | |
| # The ClientSideComponentProperties is required even if the extension don't need any property | |
| ###################################################################### | |
| # Target web URL | |
| $targetWebUrl = "https://yourtenant.sharepoint.com/sites/yoursite" | |
| # Set the name of your custom action here | |
| $customActionName = "MARK_AS_IMPORTANT" | |
| # Copy here the value of your component Id. It can be found in the manifest file of your component in your SPFx solution | |
| $componentId = "30fb80ad-539e-4e30-8fd7-dbd2fd4bf514" | |
| ###################################################################### | |
| Connect-PnPOnline $targetWebUrl | |
| Add-PnPCustomAction -Name $customActionName -Title "Mark as Important" -ClientSideComponenId $componentId -ClientSideComponentProperties "{}" -Location "ClientSideExtension.ListViewComandSet.CommandBar" | |
| $c = Get-PnPCustomAction | ?{$_.Name -eq $customActionName} | |
| $c.RegistrationId = 100 | |
| $c.RegistrationType = [Microsoft.SharePoint.Client.UserCustomActionRegistrationType]::List | |
| $c.Update() | |
| Execute-PnPQuery |
Conclusion
Using these PnP PowerShell cmdlets, you can either apply the provisioning template from a file (I will come back to it in a future blog post) and/or easily write complete and more complex scripts to provision your pages, configure their layout and options, add and configure your WebParts to your pages.
Hope you liked this post ! Please, give your feedback !
Yannick

Great post !
I have used some of your code to deploy the SPFX extension placeholder (mega menu) to multiple sites within the site collection (your code deploy to the root site only, if i am not wrong), link to the post here :https://jeffangama.wordpress.com/2017/11/07/deploy-spfx-extensions-globally-using-powershell/
LikeLike
Hi, thanks for the kind words, Indeed, in these samples, all is targeting the Root site, but it can totally be adapted.
Best regards
LikeLiked by 1 person